
How do you know you have a puncture?
MRS packrafts are incredibly durable thanks to the use of high quality and high tech polyurethane coated nylon (TPU), a far superior material to alternatives such as PVC. TPU is not only very tough with impressive abrasion resistance, it also very elastic meaning it will generally “give” first rather than damage. MRS packrafts are designed to be properly used by serious adventurers, miles away from towns and cities, deep into the wilderness and are capable of hurtling down white water, bashing against river rocks on the shore, or hidden obstacles beneath the waters surface. However, whilst very unlikely in everyday use like all inflatable boat materials, if a sharp enough object is applied with enough force, they can puncture. When out on an adventure, you want your packraft to be both tough to avoid damage, and easy to repair if damage occurs; both are true of the high quality material used to make MRS packrafts.
Further, in reality, MRS packrafts are low pressure craft. As a result, air will not rush out like it will likely do in a higher pressure PVC craft, giving you more time to get to shore to make that vital repair. On discovering you have a puncture, it is recommended that you find and repair that puncture before continuing to use your packraft.
So how do you know you have a puncture?
Some punctures are easy to find because there is visual damage. Other punctures can be so small that finding where it is requires a little bit of investigation. You will first know you have a puncture because the packraft slowly (or more quickly!) loses pressure once inflated. If you have a TiZIP fitted to your packraft, it is most likely that the air is being lost through your TiZIP, potentially from dirt/grit in the teeth of the TiZIP or more seriously, because of hydrolysis of the TiZIP material, which is a chemical reaction that can occur when the TPU coating on a TiZIP zipper has been stored in damp conditions, causing the TiZIP material to break down, leading to leaking. This often results in the need for a replacement TiZIP and would not be covered under warranty because it can be avoided through careful maintenance. To ensure you maintain your TiZIP properly, click here TiZIP Maintenance. If you find that your TiZIP is leaking and needs replacing, Paqualife can sort manufacturer replacement, Contact Us for more details and pricing.
Where punctures (or TiZIP degradation) are not obvious, the best way to locate the puncture is to apply warm soapy water (washing up liquid is fine) to the suspected areas of a potential leak, ensuring a good amount of bubbly water is applied. If there is a leak, the puncture location will show bubbles forming, or “bubbling” from the surface of the material.
On finding the leak, next you need to decide how best to repair. More guidance on your repair options and how to do it is provided below.
How to repair your packraft?
Thankfully, the TPU nylon used to make MRS packrafts is not only durable and very tough, but also incredibly easy to repair using a variety of products. Paqualife currently supply three main methods of repair, though more repair products will be added over time. The repair products offered currently by Paqualife include Aquasure glue or quick instant 3M patches for small punctures, and TPU adhesive for larger damage where a more substantial patch needs to be applied.
Small punctures
For smaller punctures, we recommend using Aquasure repair adhesive. It is applied directly onto the surface of the TPU on top of the puncture and air cures in about 1 hour after which the repair will be sufficiently capable of being used (fully hardens within 24 hours). This means that a small puncture doesn’t need to stop your day’s paddling. If you find a small puncture, simply paddle to shore, dry the area of the puncture and apply the Aquasure glue while the packraft is deflated. After an hour, you can test the puncture by inflating your packraft to the normal operating pressure. Packrafts generally operate at around 1.3-1.5psi, a relatively low pressure, allowing the Aquasure to hold the air within a relatively short time from being applied. By contrast, PVC inflatables which operate at a higher PSI need stronger glues which have a longer cure time.
Aquasure repair adhesive

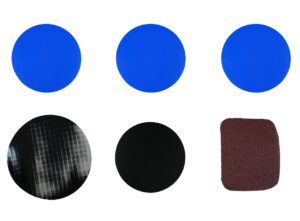
New for 2024, Paqualife are now pleased to be able to offer instant small round patches for small punctures. These are an instant fix. Simply dry the surface where the puncture has occurred and apply the patch, ensuring it has been smoothly applied without creases or air bubbles; this is easiest to achieve when the packraft is deflated on a flat (as possible) surface, pushing it onto place using a credit card or similar flat straight surfaced tool. Given MRS packrafts are low pressure, application would also be possible whilst the packraft is inflated if required; though the recommendation is to do this while deflated. Once convenient (i.e. after your trip) you can remove the temporary patch and apply a permanent repair using a colour coordinated polyurethane coated nylon circular patch Packraft Repair Material (patch) and using TPU glue Polyurethane (PU) glue (5ml). A step by step guide on using P.U. glue is provided further down this page. Examples of the permanent repair patches are shown below.
Small patch examples

Small repair patch kit
Larger punctures/tears
Where there is a larger puncture or tear, you may need to apply a larger repair patch using Polyurethane (PU) glue (5ml). TPU glue creates a chemical bond between the TPU repair patch and the tube, and is incredibly strong, curing after only a few hours.
P.U. glue
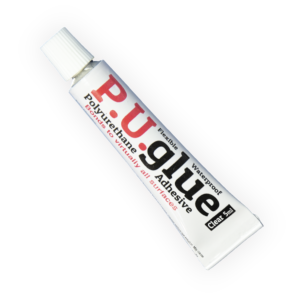
To use the P.U. glue Polyurethane (PU) glue (5ml) you will need to follow the below steps:
- Roughen the surface using some sandpaper (60 grit sandpaper would be perfect).
- To try isolate the area to roughen using your sandpaper, you can draw around the circular patch using a wipeable felt tip pen, then applying masking tape around the circular area as “best fit” as you can. The masking tape will help ensure you only sand the area required (i.e. an area the same size and shape of the patch you intend to apply) and not surrounding areas.
- After sanding, apply some P.U. glue to both the packraft and the underside of the repair patch, ensuring even light coverage, remembering that once the patch is placed on the packraft and pushed in place, some glue will squash to the edges.
- Apply the patch (with the P.U. glue applied to the underside) to the packraft, entirely covering the puncture – ideally, keeping the puncture area to the centre of the new patch.
- Squash the patch into place firmly to ensure good adhesion, squashing from middle to the edges of the patch.
- Wipe away any excess glue that squashes to the edge of the patch instantly before it cures.
- Leave the packraft, and particularly the repair area on a level surface while the glue cures.
Whilst, P.U. glue is relatively fast curing, the longer you can leave it the better, so if you can, it is best to leave it overnight (24-36 hours) for the strongest repair! If a quicker repair is needed to allow you to continue packrafting, you can consider using an instant 3M patch or TUFF Tape (instant) or Aquasure (within 1 hour) mentioned earlier.
Larger repair patches on the floor of your packraft can, on the go, be repaired using waterproof gorilla tape (or similar strong waterproof tape) on both sides as a strong means of holding the material together temporarily, but will need a permanent strong repair when time and equipment allows.
Permanent larger repair areas of the floor or the tube will not be suitable for Aquasure or the 3M patches and will need the use of the larger repair strips Packraft Repair Material (40.5 x 9.5cm strip). These will need to be applied using P.U. glue Polyurethane (PU) glue (5ml). For large repair on the tube, apply following the same guide as referred for the steps mentioned for the repair patches above, but cut the repair material to suit the size of the repair ensuring approximately 2-3cm either side of the damage.
Large repair strip material

When repairing the floor, greater strength will be required. It is advisable that for floor repairs, you use two repair strips applied using the same steps above but on both sides. If time allows, it can be easier to repair one side, allowing it to cure, then repairing the reverse side following the same steps.
If you need assistance, we are here to help
We understand that repairing your MRS packraft can be daunting if you haven’t done it before. At Paqualife we pride ourselves on being a one-stop-shop for both buying your packraft, but also when advice is needed after your purchase. If you have any damage that you are unsure how to repair, or where you would like the comfort of talking through the repair before carrying it out, we would be happy to help. Simply drop us a message or call and we will come back to you.
For any repairs that you feel are more complex than you are comfortable dealing with yourself, contact us and we will either advise how you can fix it yourself, or if needed, will explain the options available to you, including the offer of a manufacturer provided repair. Whilst sending your packraft back to MRS will involve a cost, we would be happy to talk through your options, the potential costs and likely lead times.
An MRS packraft is a really robust piece of kit, designed for serious adventure, but in the rare event that a repair is needed, we are here to help.
Shop our Sale
Check out our sale! A fantastic opportunity to own your dream packraft & accessories, at a discount!